


Backlight
This Lesser Adjutant’s head is too dark, resulting in loss of detail.
Bird Portraits: 4 Simple Tips for Finding a Better Angle
So you are out looking for birds with your binoculars and super telephoto lens. You see a beautiful new species perched on a branch, and rush towards it…but wait! In your excitement, you might end up with an angle that gives less than pleasing results. In this article, we share some tips for achieving better angles for bird portraits. (Photos and tips courtesy of Adrian Silas Tay)

1. Perched birds: Closer is not necessarily better
Both images are of the same bird, and were shot with the same camera and lens. Can you spot the difference in the camera angle?
From further away

Collared Kingfisher
From right under the tree
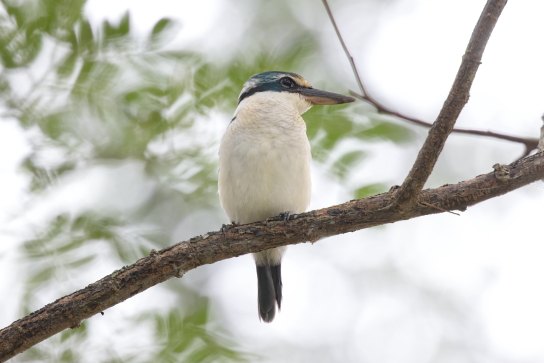
Both images: EOS R6/ EF400mm f/4 DO IS II USM + Extender EF2x III/ FL: 800mm at f/8
Tilting leads to distortions
In the first image, our attention falls first on the bird’s head and eyes, whereas in the second image, our attention falls on the underside of the bird. The bird’s body looks disproportionately larger in the second image.

Being right under the tree results in a steeper angle of elevation and a focal plane which is more tilted. This not only leads to visible distortion to the shape of the bird, but also makes it harder to get the entire bird in focus.
For the same reason, tilt-shift lenses are used to photograph tall buildings. Find out more here.
2. For shorebirds and ground dwelling birds, go low
Not all birds hang out in trees. There are lots of shore and ground dwelling birds too! It may seem that it’s easier to get a good shot simply by pointing your lens at them from where you are standing, but here’s where your shooting position makes a difference.
Look at the images below. Notice that the foreground and background bokeh effects are stronger in the low position shot?
Low position

Lesser Whistling Duck
From standing up

Both images: EOS R5/ EF600mm f/4L IS III USM + Extender EF1.4x III/ FL: 840mm at f/8
Lens level with the subject = eye level, better bokeh


When you shoot from a lower position so that your lens is at the subject’s eye level, it usually puts more space between the background and the subject, resulting in stronger background bokeh. The focal plane also makes foreground bokeh more obvious.
Tip: Rotate the Vari-angle touchscreen to shoot more comfortably from a low position or low angle.

3. Be careful of the lighting direction
You can’t control the weather or sun, but you can control where you shoot from! Move around to find the best light for your shot.

Large Hawk Cuckoo
EOS 7D Mark II/ EF500mm f/4L IS USM + Extender EF 1.4x/ FL: 700mm (1120mm equivalent)
Front lighting is considered ideal because it retains the most detail and vivid colours.

EOS 7D Mark II/ EF500mm f/4L IS USM + Extender EF 1.4x/ FL: 700mm (1120mm equivalent)/ Aperture-priority AE (f/8, 1/50 sec)/ ISO 400
Diffused lighting gives a slightly gentler feel.

EOS 7D Mark II/ EF500mm f/4L IS USM + Extender EF 1.4x/ FL: 700mm (1120mm equivalent)/ Aperture-priority AE (f/6.3, 1/320 sec, EV -0.3)/ ISO 1000
Backlight and side lighting can result in lovely dimensionality. However, do be careful when shooting into backlight as details can get lost in the shadows.
Front light
Front light captures the details clearly. The colours are also more vivid.
Tip: Animal Detection AF on Canon's latest camera models like the EOS R5 and EOS R6 will detect and track birds, allowing you to concentrate on finding the best angle!
Also see:
The Matrix Method: A Systematic Way to Add Variety to Your Shots
4. Quick, simple and lovely: Green or blue backgrounds
For a simple yet visually pleasant composition, frame the bird against a blue or green background. These colours also give a better sense of nature.

White-throated Kingfisher
EOS R6/ EF300mm f/2.8L IS USM + Extender EF2x III/ FL: 600mm/ Aperture-priority AE (f/8, 1/1600 sec, EV +0.3)/ ISO 1600

Little Tern
EOS 7D Mark II/ EF300mm f/2.8L IS USM + Extender EF2x III/ FL: 600mm (960mm equivalent)/ Shutter-priority AE (f/5.6, 1/1600 sec, EV +1.7)/ ISO 800
Species
Tip: “Green” can come from water reflections, too!

Masked Lapwing
EOS R5/ EF600mm f/4L IS III USM + Extender EF1.4x III/ FL: 840mm/ Aperture-priority AE (f/8, 1/500 sec)/ ISO 250
Bonus technique: Make use of custom camera modes (C1, C2, C3) to switch settings quickly
When a perched bird starts flying and you decide to follow it, the change in the background means that your exposure settings should change too. If you tend to use specific settings for certain scenes, the C1 to C3 custom mode slots on some camera models let you switch with just a turn of the dial or a (customised) button press.
Here is how I set my slots. When a bird takes flight, I just switch to C1 or C2 accordingly.
C1: For backlit flight shots

Lesser Adjutant
I set a higher exposure compensation value than C2 to make up for the underexposure that results from backlight.
C2: Normal flight shots

House Crow
My normal settings for birds in flight are f/6.3 to f/8, 1/1600 to 1/2000 sec, EV0 to +0.3, and ISO Auto.
C3: Aperture-priority AE mode in 1.6x crop mode (EOS R series cameras)

Chinese Blue Flycatcher
This mode allows me to quickly achieve closer crops of birds that are further away. The image above was shot on the EF300mm f/2.8L IS II USM with the EF2x III extender, and the 1.6x crop mode results in an effective focal length of 960mm.